Moving is stressful enough without arriving at your new home to find a box full of shattered glassware. Whether you are packing everyday drinking glasses, delicate wine glasses, or cherished crystal stemware, the way you prepare and protect these fragile items can mean the difference between a smooth transition and a costly, heartbreaking mess. Glassware is among the most commonly broken categories of household items during a move, and the reason is almost always the same: improper packing. This guide walks you through how to pack glasses for moving without breaking them, covering the best materials, proven techniques, and professional tips that movers use every single day. Follow these steps carefully, and your glassware will arrive at your new home exactly as it left the old one.
Why Proper Packing of Glassware Matters So Much
It might be tempting to wrap a few glasses loosely in newspaper, toss them in a box, and call it done. That approach, however, leads to breakage at an alarming rate. Glass is vulnerable to impact, vibration, and pressure. During a move, boxes are lifted, stacked, shifted, and sometimes dropped. Without adequate cushioning and structure, even a short drive across town can crack or shatter your favorite pieces. Beyond the sentimental loss, replacing quality glassware is expensive. A set of good wine glasses can cost anywhere from fifty to several hundred dollars. Investing a bit of time and the right materials into packing glassware for moving step by step is always worth it.
There is also a safety factor to consider. Broken glass hidden in a box or wrapped in paper can easily cut someone who is unpacking in a hurry. Children and pets wandering through stacks of half-open boxes are especially at risk. Properly packed glassware does not just protect your belongings; it helps keep everyone in your household safer during the chaotic days of moving in and settling down.
Gathering the Right Packing Materials
Before you pack a single glass, you need to assemble the proper supplies. Using the wrong materials is one of the most common mistakes people make. Here is what professional movers recommend:
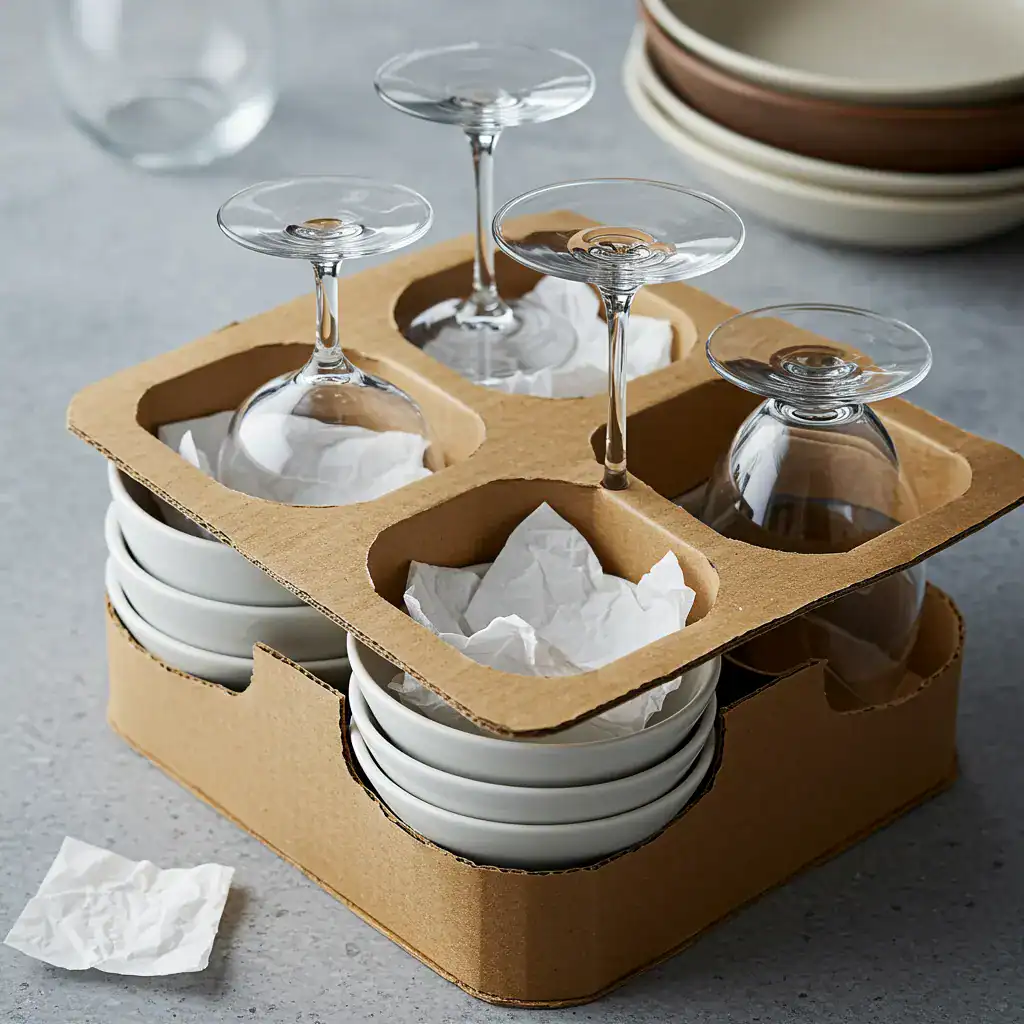
- Dish pack boxes: These are double-walled, heavy-duty cardboard boxes specifically designed for kitchen items. They are thicker and more rigid than standard moving boxes, which means they absorb impact far better. If you are serious about protecting your glassware, dish packs are non-negotiable.
- Packing paper: Plain, unprinted packing paper is the workhorse of glassware protection. Unlike newspaper, it does not leave ink residue on your items. You will use large sheets for individual wrapping and crumpled sheets for cushioning.
- Bubble wrap: Bubble wrap provides an excellent secondary layer of protection, especially for delicate stemware and crystal pieces. Use it as a final wrap around items that are already wrapped in packing paper.
- Packing tape: You need strong tape to seal your wrapping and secure the box. Do not skimp here.
- Cell dividers or cardboard inserts: Many dish packs come with, or are compatible with, cardboard cell dividers that create individual slots for each glass. These are incredibly effective at preventing glasses from knocking into each other during transit.
- Markers and fragile labels: Clearly marking your boxes is essential for communicating handling instructions to anyone who touches the box.
If you are moving a larger household, consider gathering your supplies well in advance and in greater quantity than you think you will need. It is much easier to have a little extra paper and bubble wrap on hand than to run out halfway through the job and be tempted to “make do” with unsuitable materials like towels or thin plastic bags. Quality packing supplies are a small investment compared to the cost of replacing broken glassware.
Packing Glassware for Moving: A Step-by-Step Process
Now that you have your materials ready, it is time to get to work. Follow this step-by-step process to ensure every glass is properly protected.
Step 1: Prepare the Box
Start with a clean, sturdy dish pack box. Reinforce the bottom with two or three strips of packing tape, running them both along the seam and across the width of the box. This prevents the bottom from giving way under the weight of the glassware. Next, lay down a generous layer of crumpled packing paper at the bottom of the box, at least two to three inches thick. This layer acts as a shock absorber for the items that will rest on top of it.
If your box comes with a cell divider kit, assemble the bottom layer of cells according to the manufacturer’s instructions, placing it gently on top of the cushioned base. Do not force the insert into place; it should sit snugly but not compress the padding underneath. If you are not using dividers, plan to pack heavier, sturdier glasses at the bottom and more delicate pieces toward the top.
Step 2: Wrap Each Glass Individually
This step is critical and cannot be skipped. Every single glass must be wrapped on its own. Place a sheet of packing paper flat on your work surface. Set the glass on one corner of the paper at an angle and roll it diagonally across the sheet, tucking the ends of the paper into the opening and around the base as you go. For tall or delicate glasses, use two or three sheets instead of one to provide extra cushioning.
Once the glass is completely covered, gently feel around the surface with your fingers to make sure there are no exposed areas. If you can feel any part of the glass directly, add another layer of paper. For very fragile items, such as thin crystal or antique stemware, wrap them first in packing paper and then add a layer of bubble wrap secured with a small piece of tape. Avoid taping directly to the glass, as the adhesive can leave residue or even pull off decorative finishes.
Step 3: Place Wrapped Glasses in the Box
After wrapping, stand each glass upright in the box. If you are using cell dividers, place one glass into each cell, making sure it fits comfortably without being forced. There should be a small amount of space around the wrapped glass so that the cushioning can absorb movement. If you are not using dividers, position the glasses tightly enough that they cannot tip over, but not so tightly that they are pressed hard against each other.
Fill any gaps between glasses with loosely crumpled packing paper. The goal is to eliminate empty spaces where items can shift during transport. Keep heavier, shorter glasses on the bottom layer, and reserve the top sections of the box for lighter, more delicate pieces. Once you have finished one layer, add another two-inch cushion of crumpled paper before starting the next.
Step 4: Build Layers Carefully
Most dish pack boxes are tall enough to accommodate two or three layers of glassware. Never stack items directly on top of each other without cushioning between them. After completing the first layer, lay down a thick sheet of bubble wrap or several sheets of packing paper, then add more crumpled paper to create a soft barrier before placing the next layer of wrapped glasses.
Repeat the process of positioning glasses and filling gaps until the box is nearly full. Leave a few inches of space at the top of the box for a final layer of padding. This top cushion is crucial because it protects your glassware from items stacked on top of the box in the moving truck or storage area.
Step 5: Seal and Label the Box
When the box is fully packed and cushioned, close the flaps and gently press down to check for movement. You should feel a firm but slightly springy resistance rather than shifting or rattling inside. If you hear or feel items moving, open the box and add more packing paper to fill any remaining gaps.
Once everything is secure, tape the top of the box shut with two or three strips of packing tape. Use a permanent marker to clearly label the box with the word “FRAGILE” on multiple sides, and note that it contains glassware. If you know where it will go in your new home, add a room label such as “Kitchen – Glasses” or “Dining Room – Stemware.” Labels make it easier for movers to stack boxes appropriately and for you to prioritize which boxes to unpack first.
Additional Tips for Packing Glasses Safely
A few extra habits can make the process even safer and more efficient. Pack your glassware early rather than leaving it until the last day; rushing greatly increases the chances of mistakes. Keep kids and pets away from the packing area so that items are not knocked off the table and fragile pieces are not stepped on or played with.
If you are moving long-distance or putting items into storage, consider wrapping particularly valuable pieces individually in bubble wrap after the paper layer and placing them in their own small box inside the larger dish pack. This added “box within a box” method offers superior shock protection and makes it less likely that a single accident will damage all your best pieces at once.
Unpacking Your Glasses at Your New Home
Packing carefully is only half of the process; unpacking thoughtfully matters as well. When you arrive at your new home, carry boxes marked as fragile rather than sliding or dragging them. Open them on a stable surface, away from the edges of counters or tables, and remove the top layer of paper gently instead of tearing it away quickly.
As you unwrap each glass, inspect it for damage and place it directly into its new cabinet or storage spot. Avoid stacking newly unwrapped glasses precariously on the counter, where they can easily be bumped or knocked over while you are still arranging the kitchen. Taking an extra few minutes to set each item down securely will help ensure that all the care you put into packing pays off fully.
Common Mistakes to Avoid When Packing Glasses
Even with good intentions, people often repeat the same packing mistakes that lead to broken glassware. One frequent error is placing heavy items on top of boxes marked as fragile, which compresses and crushes the contents inside. Another is using towels or clothing as a substitute for proper cushioning. While soft fabrics can be helpful in some cases, they tend to shift more easily than paper, leaving unprotected gaps around your glassware.
It is also a mistake to underestimate how much material you need. Using too little paper or bubble wrap creates thin, uneven coverage that does not absorb shock effectively. Finally, avoid leaving boxes half full. Partially packed boxes invite movement, and anything that can move can break. Always fill empty spaces with crumpled paper so that everything fits snugly and securely.
Final Thoughts
Learning how to pack glasses for moving without breaking them is less about complicated techniques and more about patience, preparation, and consistency. With the right materials, careful wrapping, thoughtful box preparation, and clear labeling, you can dramatically reduce the risk of chips, cracks, and complete breakage. By following these steps, you protect not only the monetary value of your glassware but also the memories and everyday comfort that come with using your favorite pieces in your new home.